

Neopian Battlefield Legends
| Link to Game | Trophies | Avatar(s) | ||
|---|---|---|---|---|
Play now!  |
   |
There aren't any avatars from this game. | ||
| Difficulty Meter | Neopoint Ratio | |||
|
We rate this game easy.
|
 NP Ratio: 100.00 100000 pts :: 1000 NP |
|||
Battlefield Legends takes place in the time of the 2nd war, the Battle for Meridell. You can play as either Meridell or Darigan, and stop your enemies from penetrating the end of the field. In this thrilling tower defense game, you can play on 3 different maps, and 2 additional ones that cost 250NC each, with 5 normal towers and 4 buyable towers from the mall.
How to Play
At a first glance, this game may seem quite confusing, but once you get used to it, you'll find the basic gameplay quite simple.
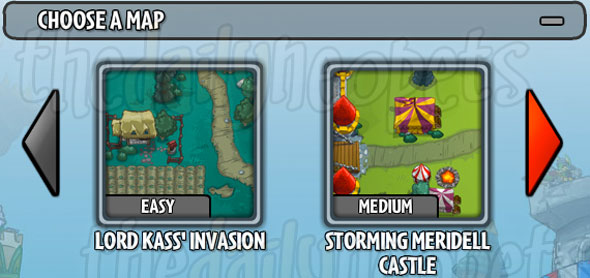
Once you start the game, you can choose your map from the second drop-down menu. Easy maps have 20 waves of enemies, medium maps have 35, and hard have 50. 2 of the maps are only unlockable by purchasing them through the NC mall.
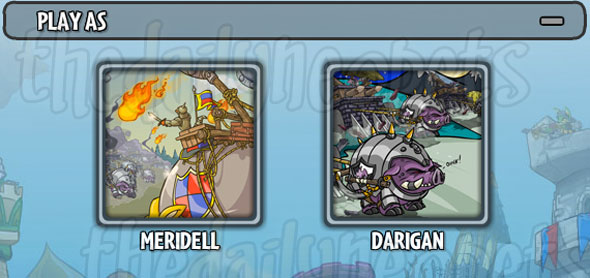
Here you can choose whether you want to play as Meridell or Darigan. The only difference is that towers and enemies look different, and that Meridell's enemies, Darigan, move from left to right, and Darigan's enemies, Meridell, move from right to left.
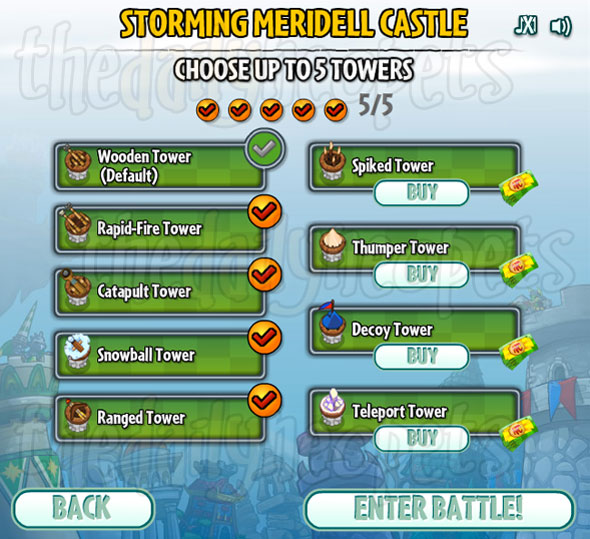
After you choose your side, you go to a page with a list of towers. You can choose 5 at once to use during the game (the wooden tower is your default tower and you choose 4 more). Almost all the maps can be completed fairly easily with the free towers. However, for the hard NC map, the thumper tower is highly recommended. Just remember, any NC towers expire 30 days after activation.
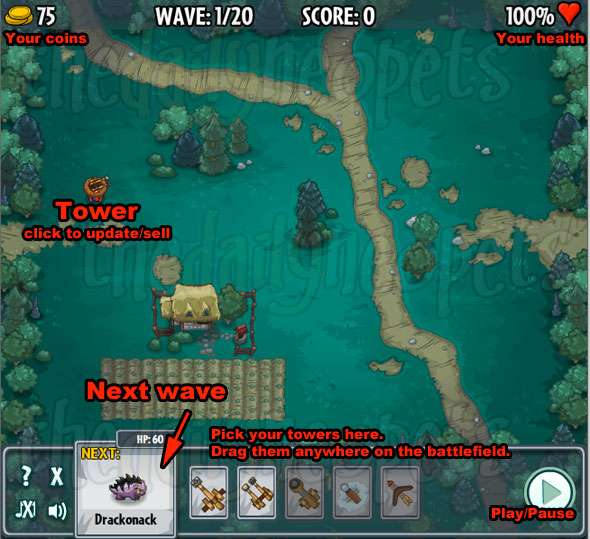
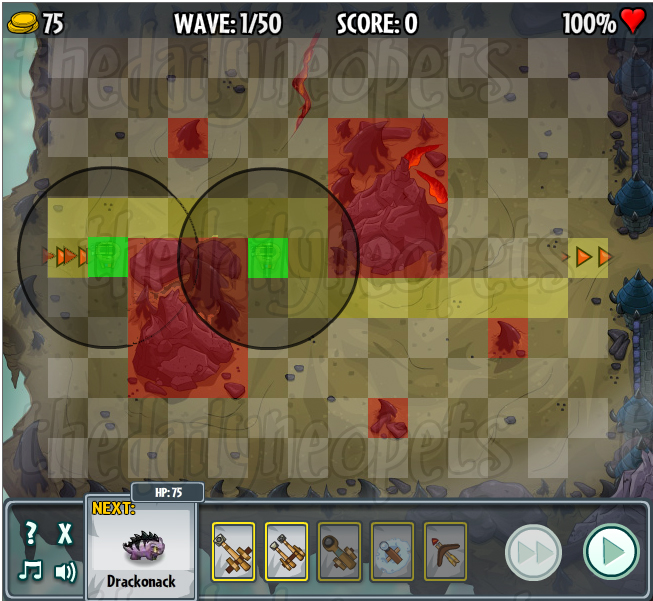
This is the main gameplay page. You can see what enemy is next and your list of towers at the bottom, and your health, const, wave, and score at the top. Everything else is the field, your towers, and enemies!
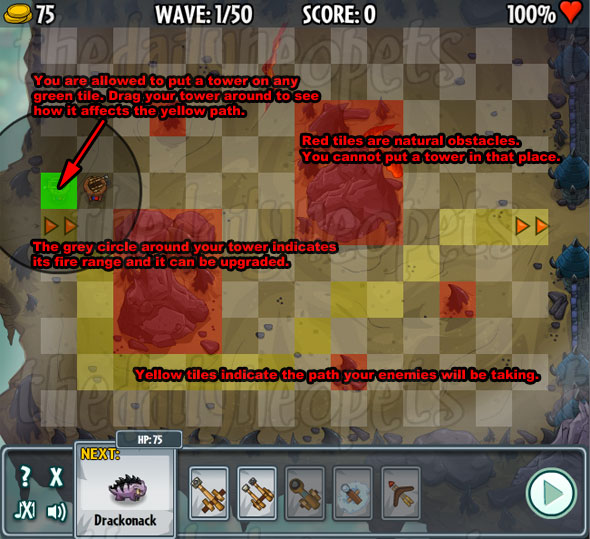
This is what you see when you try and place a tower. Towers alter the path of ground-based enemies, shown by the yellow path. Be sure never to alter the path so that enemies go around your towers.
| Enemy (as Meridell) |
Enemy (as Darigan) |
Speed | Health | Ability |
|---|---|---|---|---|
 Drackonack |
 Peasant Militia |
Normal | Low | None |
 Darigan Elemental |
 Quiggle Runner |
Fast | Low | None |
 Draik Skeleton |
 Draik Sentinel |
Normal | Normal | None |
 Skieth Guard |
 Skieth Defender |
Normal | High | None |
 Eyrie Guard |
 Quiggle Scout |
Normal | Normal | Flying Straight line across the field. |
 Darigan Schorchios |
 Draik Solider |
Normal | Normal | Flying Straight line across the field. NC Hard Map Only |
 War Machine |
 Giant Tortum |
Slow | Very High | None |
 Morguss |
 Danner |
Fast | High | Tower Sapper Attacks and destroys towers. |
 Blugthak |
 Castle Defender |
Normal | Very High | Boss NC Medium Map Only |
 Lord Kass |
 Jeran |
Normal | Very High | Boss Free Hard Map Only |
| Tower | Tower Cost | Upgrade Cost | Firing Rate | Power | Notes |
|---|---|---|---|---|---|
 Wooden Tower |
50 Coins | 30 Coins | Normal | Low | This is the basic tower, and you shouldn't need it until you get to Hard Mode. It's great for building walls, but not much else. |
 Rapid-Fire Tower |
75 Coins | 60 Coins | Fast | Normal | Probably one of the best towers in the game. This tower has a great firing to power rate. A bunch of these really deal some damage to stronger enemies, and easily take out weaker ones. |
 Catapult Tower |
150 Coins | 75 Coins | Slow | High | The strongest free tower, paring these with Rapid-Fire Towers can destroy anything. Those are the two main towers for Easy and Medium. These you put at the entry to kill Tower Sappers. One of the best towers. |
 Snowball Tower |
200 Coins | 100 Coins | Normal | Low | Despite their special effect of slowing down enemies, the Snowball Tower is the overall worst tower. It does not fire fast, and the damage rate is terrible. The effect isn't even that good to begin with, as it is only temporary. |
 Ranged Tower |
225 Coins | 125 Coins | Normal | Normal | Ranged towers are great. They have a gigantic range and do extra damage to flying enemies like Eyrie Guards. You'll likely use this tower in every level. |
 Spiked Tower (150 NC) |
200 Coins | 125 Coins | Low | Normal | Spiked towers are really not good. Their firing rate is slow, so they tend to miss all the time, and they don't do a ton of damage. Do not buy. |
 Thumper Tower (200 NC) |
250 Coins | 150 Coins | Normal | High | A fantastic tower where you came wherever you want. You must choose where and when it attacks manually, but the damage is amazing. |
 Decoy Tower (100 NC) |
40 Coins | 30 Coins | None | None | Terrible towers. The only thing they do is draw sappers so you can attack them and build paths. Probably not something you want to purchase unless you're after the Decoy Tower Trinket |
 Teleport Tower (150 NC) |
200 Coins | 100 Coins | Normal | Low | These towers are almost identical to plain Wooden Towers, except for their ability. These towers can change their location, so a great for when an enemy slips past your defenses. Buy at your own risk. |
Level Guides
| Level | Overview | |
|---|---|---|
 Lord Kass' Invasion |
As the name suggests, this map is the easiest and a good one to start on to get the hang of the game and get a feel for the different types of towers. The basic free towers will be more than enough to help you defeat this map. There are only 20 levels, no runners (so snowball towers shouldn't be necessary) and no bosses. A few fully upgraded rapid-fire towers, catapults and a ranged tower or two should do the job. The last level consists of a wave of War Machines or Giant Turtums, depending on which side you are playing as with HP: 4,050/each. | |
 Storming Meridell Castle |
In this map, you are introduced to tower sappers and runners. When a tower sapper begins attacking one of your towers, the tower begins firing only ar the sapper and not the wave of enemies (unless one of the enemies crosses paths with the sapper at the moment the tower is firing and it hits it instead of the sapper). Sappers will begin attacking the tower closest to the entrance of the map, the left side when playing as Meridell and the right side when playing as Darigan. If he manages to destroy that tower, he moves on to the next closest tower and so on. The other towers continue to target the wave until they have all been defeated and, if the sapper hasn't been defeated yet, will begin firing on him if they are within range. With runners, it is helpful to have a snowball tower to help slow them down a bit. However, in this level, if you have a good mix of hard-hitting towers (like the catapult) and fast towers (rapid-firing) you don't need to have the snowball tower. This map has 35 levels and as in the easy map, there is no single boss at the end, but rather a wave of War Machines or Giant Turtums this time with HP: 4,200/each. |  King Skarl is not Amused |
This is one if the two maps that must be purchased with NC. Again, the basic free towers will be more than enough to get you through this map. Concentrate on building and upgrading rapid-fire and catapult towers. A couple ranged or snowball towers could be add in the back half of the 35 levels (after level 17 or 18) if you hve extra gold, however, it is fairly easy to complete this map using only catapults and rapid-fire towers. You are introduced to your first boss in this map. If you are playing as Meridell, the boss will be Blugthak. If you are playing as Meridell, the boss will be a Castle Defender. Both bosses have HP: 18,600. |
 Meridell's Counterattack |
This is the hardest of the free maps. There are 50 levels in all and you will see all types of enemies, including runners, flying enemies and tower sappers. As in the other maps up to this point, it is completely possible to complete all the levels with 100% health just by using the basic towers and a little bit of strategic placement. If you want a bit of an advntage, NC Thumper Towers are helpful. You will use mix of all the towers to get through the level, making sure to include quite a few catapults. There is also a single boss for this level. If you are playing as Meridell, the boss will be Lord Kass. If you are playing as Darigan, your boss wil be Jeran. Both bosses have HP: 25,000. | |
 Courtyard Ambush |
This is the other NC map and the hardest of all to beat. It is very hard to beat this map without the aid of the NC Thumper Tower. Your best option would probably be to switch out the Ranged Tower for the Thumper Tower if you decide to use it. This map requires the most strategy to be able to win (get through without using up all your health). By using a "maze strategy,"* you give your towers the best chance to destroy all the enemies in a timely fashion. Like the free hard map, the NC map has 50 levels. The main differences are the hit points of the enemies are higher and there is not a single "boss" at the end of the level, but rather a wave of War Machines/Giant Turtums with HP:26,000/each .This is where the Thumper Towers are the most beneficial. More on a useful strategy for this map below. | |
Tips
- You do not get more points for having large amounts of gold left at the end. Your score is based on how many levels you get through and your health. Someone who builds the minimum amount of towers to win with a health of 100% and has thousands of gold left will receive the same score as someone who made it through the same number of levels with health at 100% but who only has hundreds of gold left. Some people like to challenge themselves by seeing how little gold they need to spend, but to be safe, it's always better to have too many towers than not enough, especially when sappers start to attack your towers.
- When a tower sapper is attacking one of your towers, your tower has a health bar, just like your enemy. When your health is drained, your tower is destroyed and is no longer functional. To get rid of it, you must sell it for nothing. To avoid losing your tower and all the gold you spent on it, there are two methods. If your tower is not fully upgraded (the fully upgraded towers have spikey-looking tops), upgrading the tower will restore it to full health. If you time it so you upgrade it just before its last health gets drained, you are doubling its fighting life, giving it until the health runs out again to take down the sapper. If the tower has already been fully upgraded or there is no way you'll have enough gold to upgrade it, you could also sell it just before it runs out of health. This is a last resort, as you will lost both the tower and some of the money you spent on it. Even after uprading, you only receive about two third of the gold back that you spent on the original tower. Still, it's better than "selling" a destroyed tower for no gold.
- The hit points of the enemies go up as the levels go up. This is why a couple rapid-fire catapult shots in level 1 may have killed a drackonack, it may take a few hits from a fully upgraded catapult by level 40 to kill the same enemy.
- When placing new towers, yellow shading appears that indicates where ground enemies will walk and a black circle appears around the tower's firing range. Use these to your advantage when placing towers, making sure to cover as much of the path as you can with the firing ranges of the towers. Also, keep in mind that flying enemies will not follow this path because they're in the air and don't have to worry about dodging ground obstacles. They will fly in a straight line from entrance to exit across the field. Make sure you have enough towers to cover this path, as it is sometimes not covered by the towers on the path of the ground enemies.
- While NC towers expire 30 days after you purchase them, you get to keep any NC map you purchase.
- Placing towers in the inside corner of the ground enemies' paths or in between two parallel enemy paths allows for the firing range to reach the enemies for the greatest amount of time/number of shots. This is shown below in the Strategies section.
- Thumper Towers are really the only useful NC tower as they deal huge amounts of damage, especially when fully upgraded. As they are used by clicking on them and then clicking where you want them to strike, they can be placed anywhere without interfering with other towers' high access to the enemies' paths and still be used. Thumper Towers have to "recharge" after each use. They take about 10 seconds to do so. If you have multiples of them (as shows in the strategy below), you can cycle through them while each one is charging. If you have say, 5, you use the first one, then the second, and so on. By the time you get back to the first, it should be charged. As you have to aim them and click each one manually to fire, it takes a bit of time to fire each. If one takes about 10 seconds to charge and about 2 seconds to aim/fire, having more than 5 or 6 is a waste of money because you would not be able to fire that many before the first is done charging and able to be used again. Only 6 (if you're a fast clicker) could be in use at any one time.
- The maximum number of points possible, by finishing either of the Hard maps with 100% health, is 125,266.
- Each time an enemy gets past your towers and out the other side of the yard, you lose 10% health, meaning if you let 10 enemies through, your game ends.
Strategies
The Easy and Medium maps have less enemies in each wave with fewer hit points so bombarding them with the most powerful/fastest firing towers is enough to ensure victory. However, when you get to the two hard maps, simply having a few high-power towers isn't good enough anymore. You will need to start making more decisions about what types of towers to buy, when to buy them, where to put them and when to upgrade them.
Meridell's Counterattack
First Two Towers
By starting off with 2 rapid firing towers in these positions, you get the maximum amount of coverage for the
best price (you will use up the 150 gold you start with). Placing towers in corners is a great way to maximize
the amount of time an enemy is exposed to it, giving the tower more time to do its job.
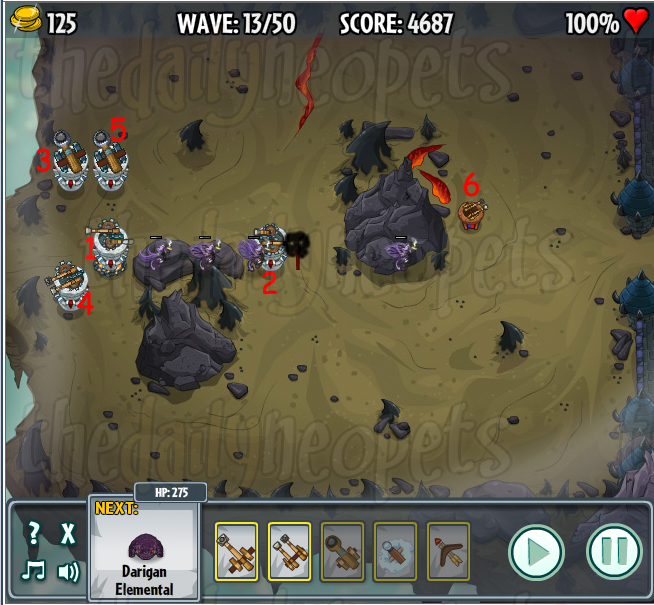
The best strategy for this map is to cluster the majority of your towers around the enemy's entry point (I'm playing as Meridell here. If you were playing as Darigan, the entry would be on the opposite side of the screen). However, as you are also contending with sappers, it couldn't hurt to have a few towers away from the cluster in case an enemy or two slip through the main group of towers.
Finished Map
This is usually what my finished map looks like. The yellow blocks is the ground enemies' path while the yellow
line is the path the winged enemies take. Again, this is playing as Meridell. As Darigan, your entrance is
on the other side, so the positions would be reversed. Because the path of the winged enemies only
passes through one squre of each of the catapults at the top, I added 3 Ranged Towers under the second rectangular
group of stones. Their firing range is roughly circled in yellow. The lone tower on the far right is from when
a sapper destroyed one of my towers on the left, allowing a couple of the enemies to slip through. The right tower
was built to catch them before they got through the exit. Notice how the Boss of this level is almost out of health,
despite only being part of the way across the map.
Below is another look at this strategy partway through. The towers are numbered in the order they were built.
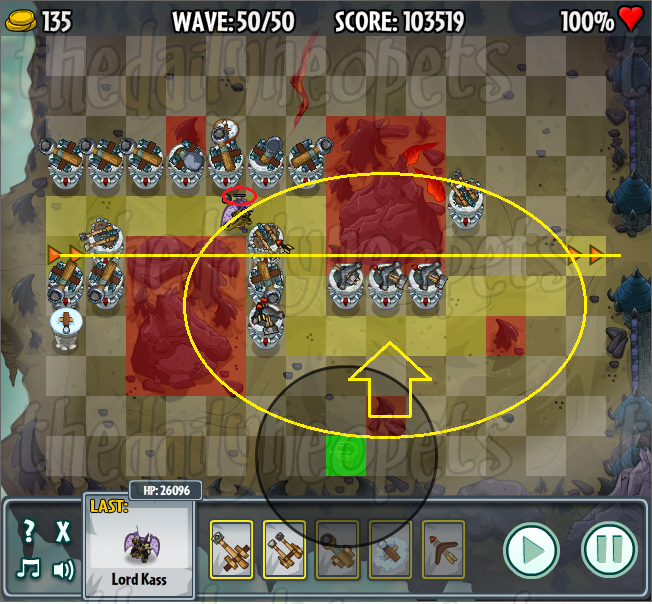
Courtyard Ambush
Creating a long enemy path
This is the other NC map and the hardest of them all. What makes this map so difficult is the
many waves of enemies with high numbers of hit points. This is the map that requires the most strategic placing of towers
and choosing when and which towers to upgrade.
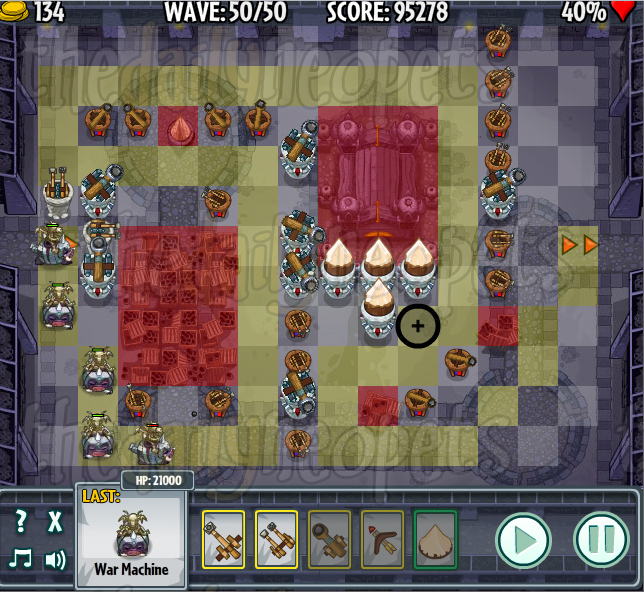
Notice how long the enemy path is by the last (and hardest) wave? This is for a couple reasons. I am using the Thumper Towers which are fired manually and are required to charge after each use. By making the enemies stay on the map as long as possible, I have more oppertunities to hit them with the most damaging tower. Accordingly, if you didn't decide to use the Thumper Tower, you could still employ this method, but you would have more upgraded catapults and would have likely included a few Snowball Towers to slow down your ememies to give your towers more time to hit them. Also notice how the path is designed to pass by many towers twice, giving them twice the opportunity to be hit.
Extras
Apart from the Neopoints you can win with this game, there are also different Neopoint and Neocash items you can win by completing certain tasks for the first time. Note that you can only win each item once.
| Neopoint Items | |
|---|---|
 Battlefield Legends String Lights |
Score 10,000+ points before sending your score |
 Battlefield Legends The Board Game |
Score 60,000+ points before sending your score |
 Battlefield Legends Hat |
Score 100,000+ points before sending your score |
| Neocash Items | |
|---|---|
 King Skarl Throne Background |
Win a battle while playing on the King Skarl Is Not Amused map |
 Courtyard Ambush Background |
Win a battle while playing on the Courtyard Ambush map |
 Spiked Tower Trinket |
Win a battle after using a Spiked Tower at least once |
 Thumper Tower Trinket |
Win a battle after using a Thumper Tower at least once |
 Decoy Tower Trinket |
Win a battle after using a Decoy Tower at least once |
 Teleport Tower Trinket |
Win a battle after using a Teleport Tower at least once |
Conclusion
This is a fun strategy game that gives the player a lot of control over how they choose to play, allowing the mixing and matching of towers and maps to create your very own battle. Apart from awarding neopoints, you can also earn fun customization items to dress up your pet and show off your skills in battle. This is a great game for beginners and pros alike and, because there are so many options to customize the game, is always new and exciting!
Alerts
 The Snowager
Next sleep in 0h, 32m, 7s.
 Next Possible Wake
Jun 18: 3 AM/PM NST
Jun 19: 8 AM/PM NST
Jun 20: 1 AM/PM NST
Jun 21: 6 AM/PM NST
 Obelisk War: Join Faction
Next cycle: 0d, 18h, 32m
