

Hannah and the Kreludor Caves
| Link to Game | Trophies | Avatar(s) | ||
|---|---|---|---|---|
Play now!  |
   |
There aren't any avatars from this game. | ||
| Difficulty Meter | Neopoint Ratio | |||
|
We rate this game medium.
|
 NP Ratio: 20.00 20000 pts :: 1000 NP |
|||
Introduction
Hannah and the Kreludor Caves is a fun, easy game once you get the hang of all the controls. You play as Hannah, traveling through Kreludor over spikes and robots to get to the exit of each cave before you run out of oxygen.
Controls & Instructions
The basic controls for controlling Hannah are easy enough to understand. You use the right and left arrow keys to move Hannah back and forth. You use the down arrow key to crouch, you hold down that key while moving back and forth to crawl. The space bar is used to jump, and holding it down once you are in the air activates your rockets. The up arrow key also activates your rockets if you press it after you jump into the air.
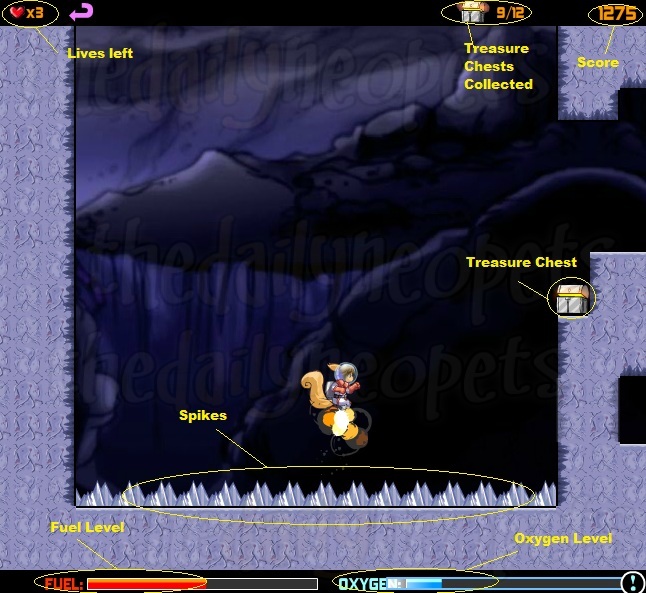
There are also various icons on the screen that are important to pay attention to. The top left of your screen during gameplay will display how many lives you have left. The top right shows how many treasure chests you have collected so far and your score as well. Along the bottom of your screen, your fuel and oxygen levels are displayed. When either is running low, the bar will begin to flash and an exclamation mark will appear to the right of the bar.
Get through the cave before you have no oxygen left. This seems easy and straightforward enough right? Well, unfortunately, it isn't always that easy.
There are various treasure chests on each level, and you MUST collect them ALL to open the exit door. There are also levels in which there will be a door blocking your way with a colored lock, you must find the key that cooresponds with that colored lock to open the door and continue moving through the level.
Did I mention the robots and spikes you have to avoid? Well, as long as you can get past all of that, with enough oxygen left, you are in the clear. Also of importance? Fuel! You will not lose a life if you run out of fuel, but you will quickly realize that if you run out fuel, you won't last much longer through the level.
You must look out for certain things during gameplay to make sure you can get through each level. You will come across these items, and this foe, when going through each level.
| Items & Foes | |
|---|---|
 |
Collect these to help refill your oxygen tank. |
 |
Collect these to help refill your fuel tank. |
 |
You must collect all of these on each level in order to open the exit. |
 |
Collect this to get an extra life. |
 |
Use these to open the coordinating doors. |
 |
You cannot fight these; Make sure you jump over them! |
Tips & Strategies
This game being so extensive, there was no way to fit all the instructions into a small section. So a level by level run through has been prepared for all fifteen perilous levels.
The Adventure Begins!
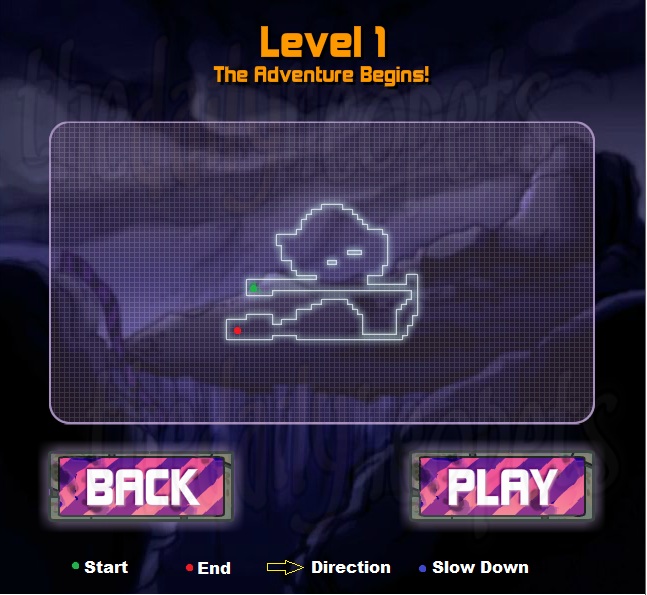
Okay, this level is pretty straight forward, not much difficulty. Just move from start to finish collecting all the treasure chests along the way.
An Introduction To Danger
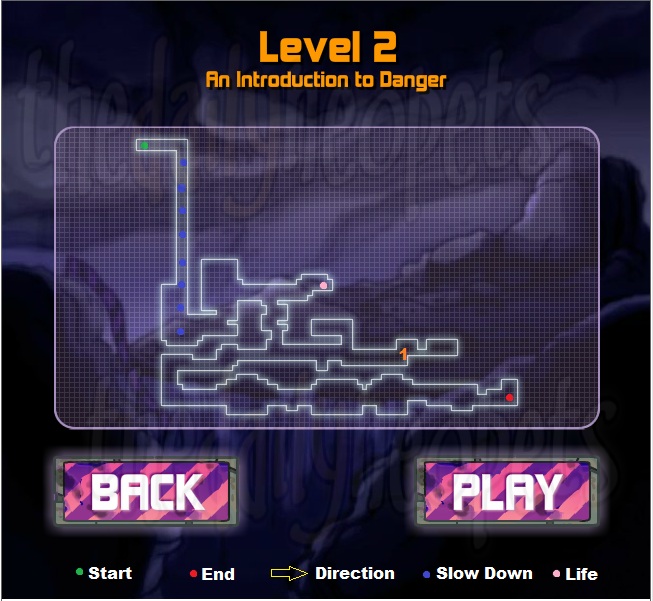
Okay, so the first drop seems totally intimidating, but I promise it isn't that bad. As the map says, slow down! All you have to do is press your fuel a few times going down so Hannah doesn't go splat! I only pressed mine twice, but depending on how skilled you are you may need to press it a few more times. Never let the yellow exclamaton appear when you are falling ! That means danger, and you should press your fuel immediately for a second. After that, don't forget to grab that life before going down to area 1 and ultimately the finish.
The Vault
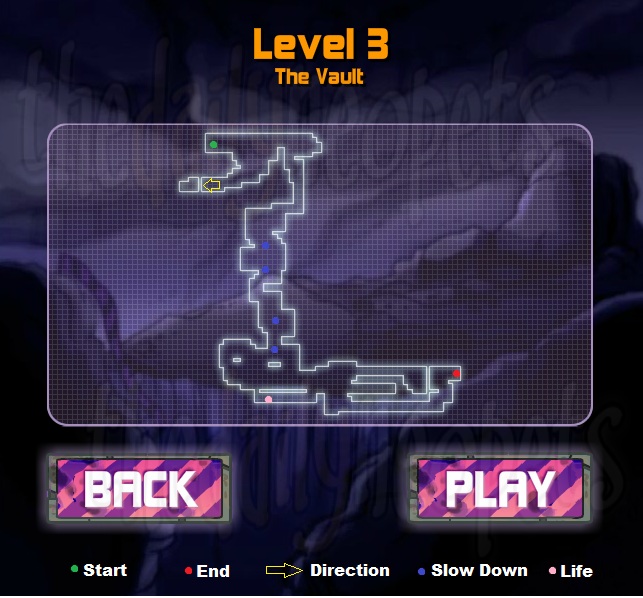
At the beginning pay attention to that arrow I have added to the map. It leads to a secret area that you should make sure you go to.
After that, continue down the cave. When you get to the larger drops slow down as you see fit. Mind you there is another extra life on this level. I wouldn't recommend trying for it if spikes make you nervous.
If you are chock full of bravery though, simply hold the down arrow key so that you are crouching and use use your right or left arrow keys to direct Hannah to crouch. DO NOT LET GO OF THE DOWN ARROW KEY, unless you likes spikes in your head that is.
After that, you come up to an area of 3 levels with doors and keys, it is pretty easy, just grab the key and open the coordinating door, by the end of it all pathways should be open to you.
The lowermost pathway takes you the the finish.
Rock Your Rocket Boots

If this is your first time playing this game you don't know this as the *out of fuel* level like those with experience. Get ready for a serious stress test on this one. Okay, it's not really THAT bad, but it can be if you aren't careful.
The easiest way I find to get across these perilous, spiky, jumps of doom are to run (if possible) and jump, and at your HIGHEST point press the fuel for about 2 seconds then release. Then when you begin to sink, press the fuel for 2 seconds again so you don't become a piece of swiss cheese.
Repeat this to get to the second platform, which leads to a platform over head with some extra fuel *phew*. After that go back down to the second platform and continue to the third with the same jump + fuel methods.
After you pass that, the rest of the level is fairly easy with a few jump and some more spikes to deal with. Make sure you grab the life close to the end of the level, it requires a bit of fuel to get to it, but you should be okay by then.
Robot Village
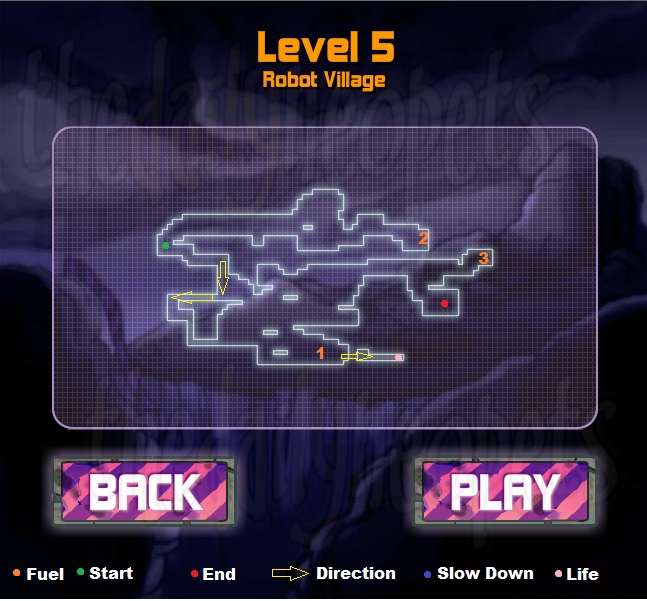
Ahh, scary robots ! Eh, not really. This level is not as bad as it may seem. Make sure you visit the areas in order, and follow those arrows to area one because there are items there you need that you won't be able to get any other way.
When you stop by area 1 make sure you go to the secret area where the life is, watch out for the stalker type robot in that area though. After that grab everything on your way to area 2 and within that area as well. In area 3, watch out for that last robot as you head for the finish.
Treasure Adventure
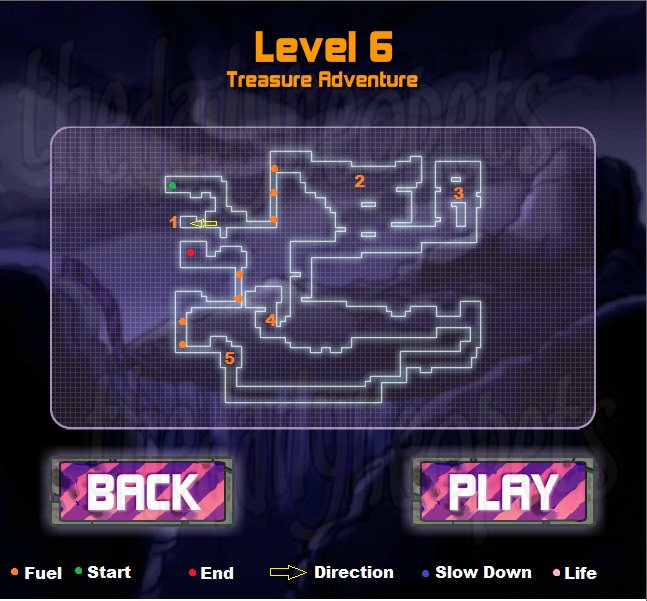
Okay, I died when I first did this level. I didn't know there was an order to things so I went to area 5 too early before I got everything and I ran out of oxygen and died because I couldn't get back.
My advice: Go to all the marked areas IN ORDER. And DO NOT forget about area 4, that's where I messed up. If you get everything, finishing this level shouldn't be an issue.
Watch Your Step!
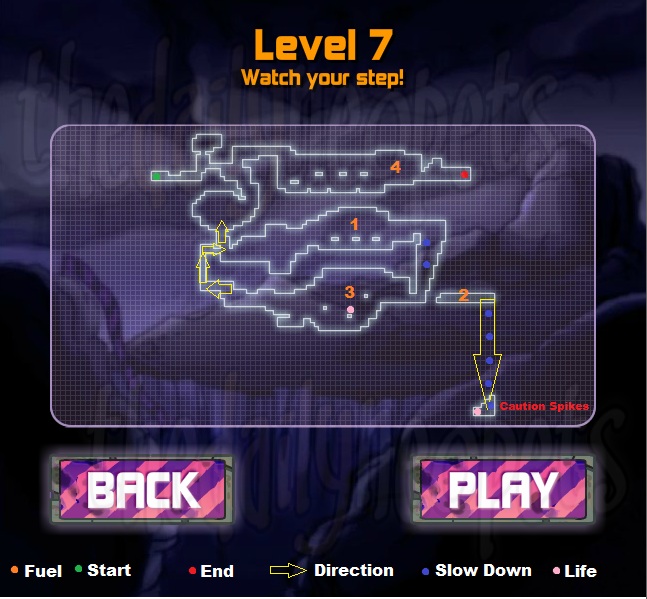
Bypass that top area and go straight down to area 1. Grab everything on the way there. When you reach area 2, be careful going for that life because there are spikes at the bottom, make sure you slow down enough to go left and not crash into them.
Careful in area 3 as there are many spikes and tiny platforms. Follow my arrows to go back up to area 4, then off to the finish.
Cool Your Jets
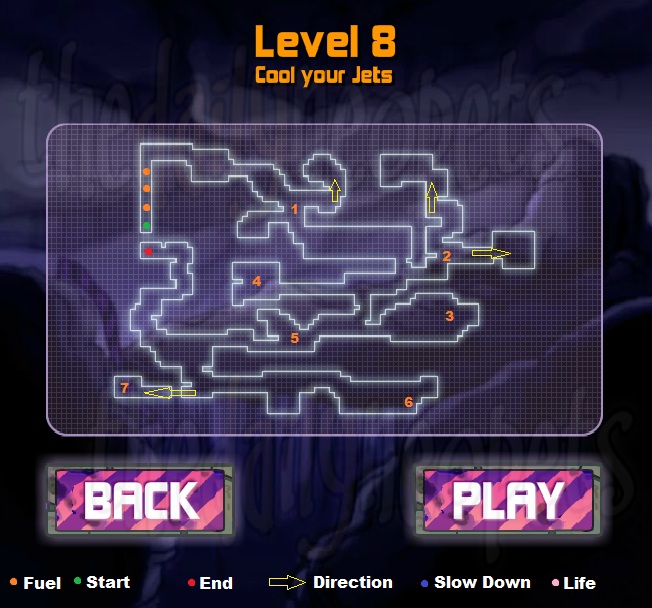
This level just requires that you go to all the area in order and grab EVERYTHING on your way through. The arrows in areas 1 and 2 simply indicate that you should make sure you explore everything in that area before moving on.
Area 7 is a secret passage, but make sure you go there as well. If you hit everything and got all the items, the end should be clear.
Big Drop! Don't Make A Crater
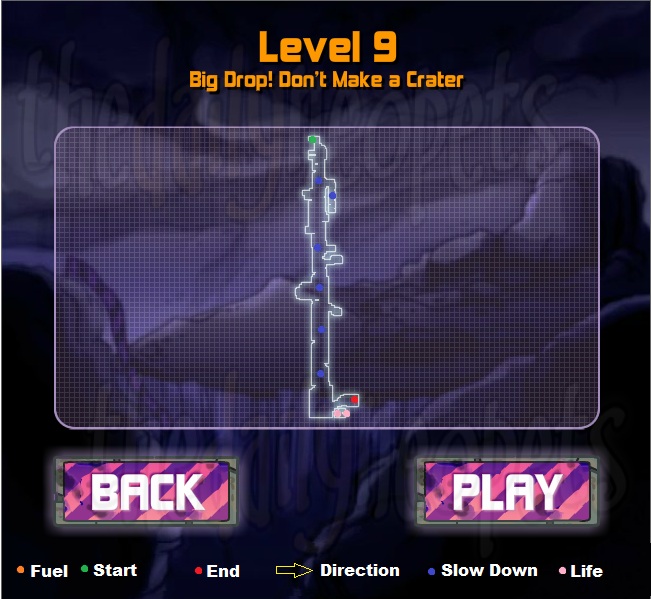
The famous repeater for all those aiming for a trophy! This is not as hard as it looks by any means. You travel down, slowing down and grabbing all the items on your way, because it is NOT easy going back up. Having to go back up wastes fuel and oxygen, so take your time on your way down.
And, I promise you will NOT run out of fuel, they give you beyond enough on this level.
There are two extra lives on this level if you want to venture for them. You must stand out the ledge where the last treasure was before the finish, let yourself fall but let the up arrow key be you best friend, you will need the fuel. Go immediately right and into the secret area for the lives. Coming out is similar, simply go left pressing the up arrow key immediately. Then off to the finish.
Back To The Start
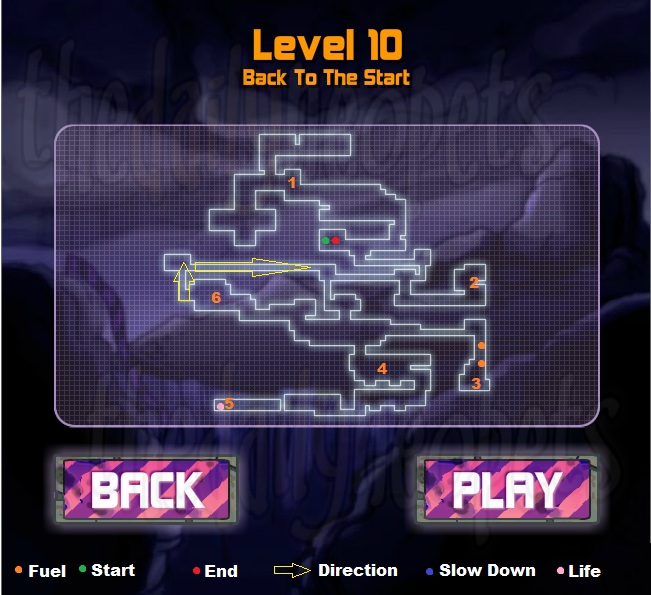
The beginning is the end, and the end is the beginning. Or at least it is on this level. You start right by the finish, which is of course closed off. Make sure you visit EVERYWHERE in order and grab EVERYTHING. Also notice the extra life in that secret area full of spikes. A basic crawl will get it for you and it's easy pickin's to the finish line.
Lunar Caverns
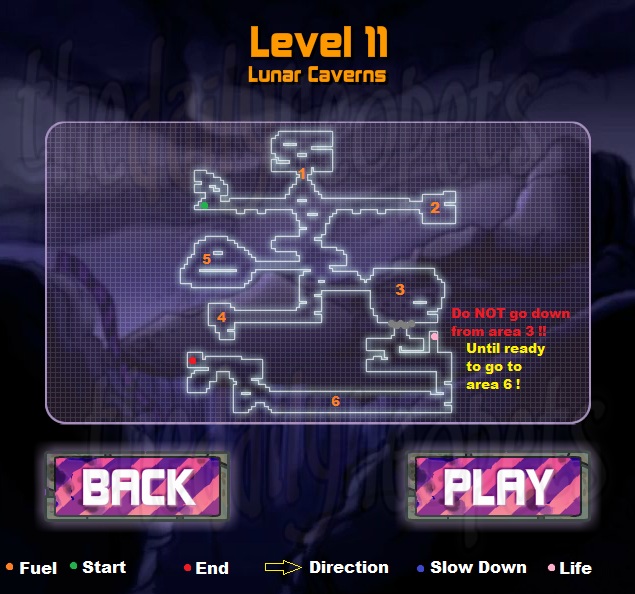
This is a good repeater level because it gives a lot of points, so keep that in mind trophy hunters. Follow all indicated areas in order, do NOT go down from area 3 until you have gone to areas 4 and 5 first. After that it is easy to the end. Grab that extra life before proceeding down to area 6. There is a robot in area 6 that you cannot jump over, so make sure he is all the way to the left before proceeding through. Then off to the finish!
Choose Wisely

I keep repeating this but, visit all the areas in order ! Make SURE you get to the secret area in area 2, it is necessary. And get EVERYTHING in area 3, that means go up as far as you can.
I messed up when I first did this level and missed some items in area 3; I ran out of oxygen and died. After that, it's the same strategy as level 4 to get across the spikes to area 4. Grab that life on your way across. Then it is pretty clear to the finish.
Satellite Canyon
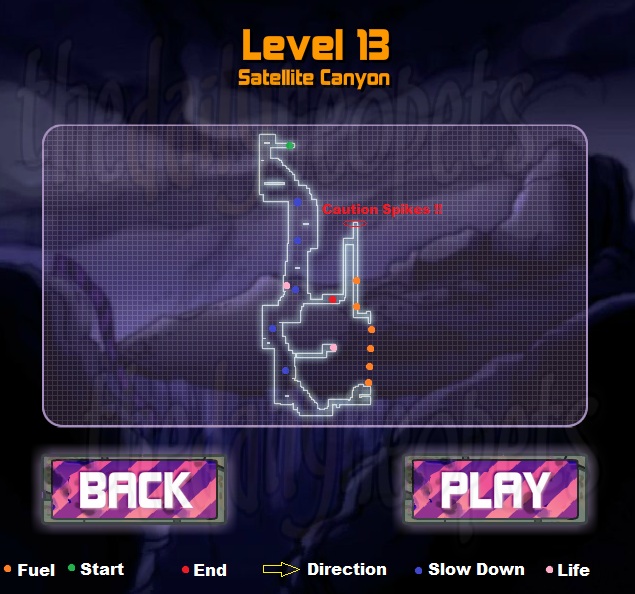
This level is only difficult because it is a HUGE chasm and your falling. You MUST slow down and manuever everywhere when falling or you will miss items. I guarantee it, because I missed things my first run through. Check every ledge and slow down as much as possible without running out of fuel.
There is a life to your left as you fall on a ledge, some spikes are above it, so careful when trying to obtain it.
Make a stop by the area where the finish line is to grab some fuel and oxygen, then continue on your way down, slowly. You can venture and get that life to the right, I personally did not because it used too much fuel, but it is up to you.
Careful on your way towards the bottom, there are many spikes to look out for, so make sure you are going slow. Once you have good footing, continue to the right where you will need to use you fuel to rocket up to the next ledge.
You will then need to do the same thing again, but be VERY careful the second time, because there are spikes overhead and if you hold the fuel down too much you will shoot up right into them.
After that, fall slowly to the finish, which should be open if you grabbed everything.
Hold Your Breath
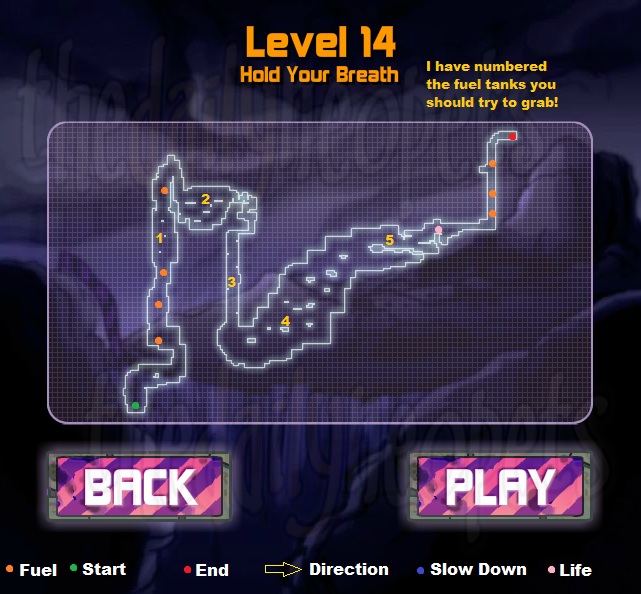
You WILL run out of oxygen your first run through this. Why? Because you WILL try grab every fuel container. DON'T DO IT! On the map I marked the containers I think you should grab on your way through. This level literally requires you to rush because you only have a about a minute and a half of air to make it through.
Fuel in area 1 isn't *necessary* but you should do you best to catch what you can as you rocket your way up. DO make sure you grab the fuel in area 2 though.
There will be fuel tanks as you fall down area 3, catch what you can, but do not stress them. The fuel tank in area 4 is a necessity as it is on a ledge with a key.
Grab fuel from area 5 and be quick getting that life. After that, rush off to the finish before Hannah suffocates!
Final Cave
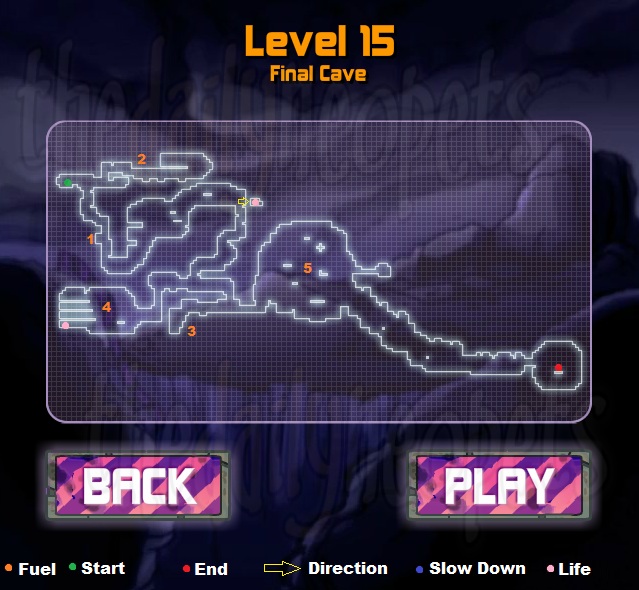
Well, we didn't do all that work for nothing right? Unfortunately, there is NO mercy shown on this level, so be prepared to do a lot.
Hit area 1 first, because there is a key you need, then proceed on to area 2. On your way to 3 make sure you grab that life, and look out for the robots! Hit area 4 for a few keys and another life then proceed over to area 5. Many platforms, many spikes so be careful here. That little area with tunnel to the right is necessary so make sure you stop there because there is a treasure chest there you need.
Move towards the finish but before you get there watch out for the three final robots. Follow them as they walk right, when they begin to walk back, jump in the air and hover above them until they all passed, after this it's a clear shot to the finish and you're officially a Kreludor Caves master !
Tip: When you first begin, by that first drop on the second ledge down to the right, if you jump and go right, there is a secret path that lets through to the large open area on the way to area 3. You can use this as a shortcut when coming back from area 2. ;)
Conclusion
Hannah and the Kreludor Caves can be tough if you don't have the right strategies. If you have a good idea of what you need to do and what you're aiming for, the game is fairly easy and is very fun when you overcome all the challenges of each level. And once you master the 15 game levels, there are always those crazy player made levels from the Hannah and the Kreludor Caves Spotlight!
Alerts
 The Snowager
Next sleep in 3h, 57m, 13s.
 Next Possible Wake
Jun 11: 3 OR 4 AM/PM NST
Jun 12: 8 OR 9 AM/PM NST
Jun 13: 1 OR 2 AM/PM NST
Jun 14: 6 OR 7 AM/PM NST
 Obelisk War: Truce
Next cycle: 4d, 21h, 57m
Neopia Today
The Runway Contest

Recently At Forums
- Thursday, June 11
- Wednesday, June 10
- The Void Within: Finale
- Tuesday, June 9
- It's Petpet Appreciation Day!